Importing Lots
To import lots into AF360, first catalog them in an Excel spreadsheet and save the file in CSV format. The import process is conducted within the ‘Lots‘ page of AF360.

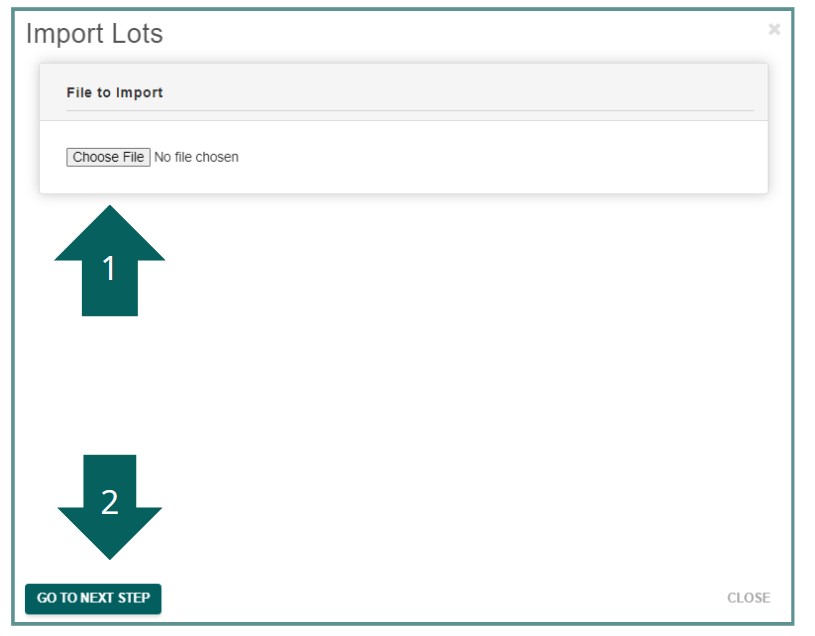
- After clicking on ‘Import Lots,’ you’ll be prompted to choose your CSV file for import.
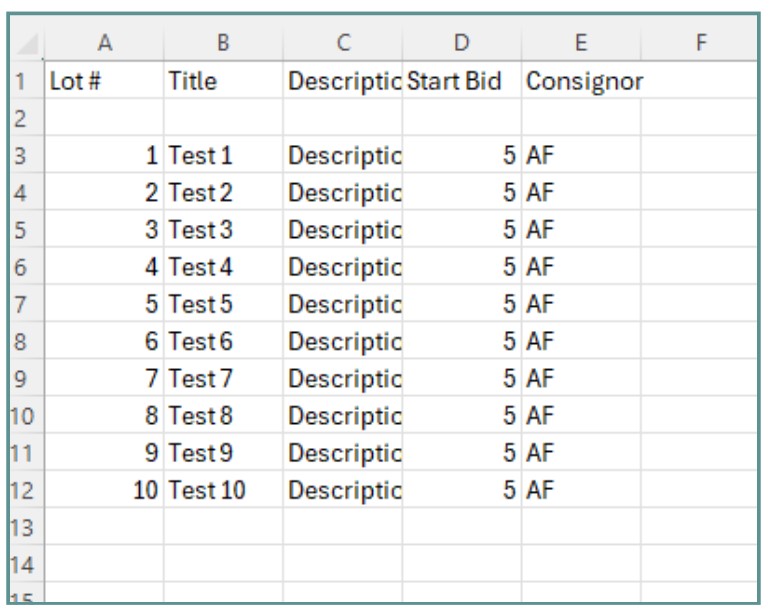
- This is the sample spreadsheet we’ll be importing.
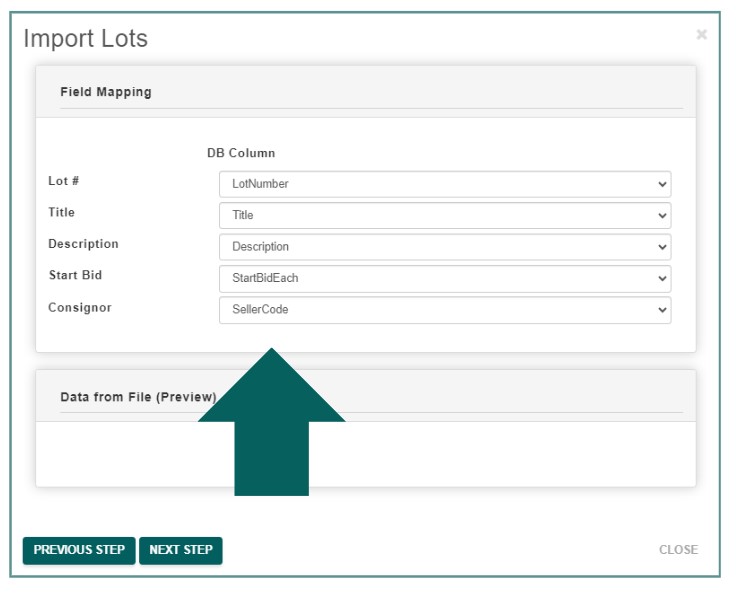
- After selecting your file and clicking ‘Next Step,’ you’ll be prompted to configure your field mapping settings.
Field mapping is a crucial step in the lot import process, where you align the columns from your CSV file with the corresponding fields in AF360’s database.
In the screenshot provided, each field on the left (such as Lot #, Title, Description, Start Bid, and Consignor) corresponds to a column in your CSV file. The dropdown menus on the right allow you to select which column from your CSV file matches each field. For example, the “Lot #” field is mapped to the “LotNumber” column from your CSV file, ensuring that the data is correctly imported into the appropriate categories within AF360.
Note:
Lot Import > Shippable Option Added – We’ve made it easier for you when importing lots via CSV by introducing a “Shippable” field. You can now specify whether an item is shippable by entering T/F or true/false in the CSV file. To use this feature, make sure your auction is set to Shipping Determined by Lot in the Auction Details section. This provides more control and flexibility when managing shipping options for your lots.
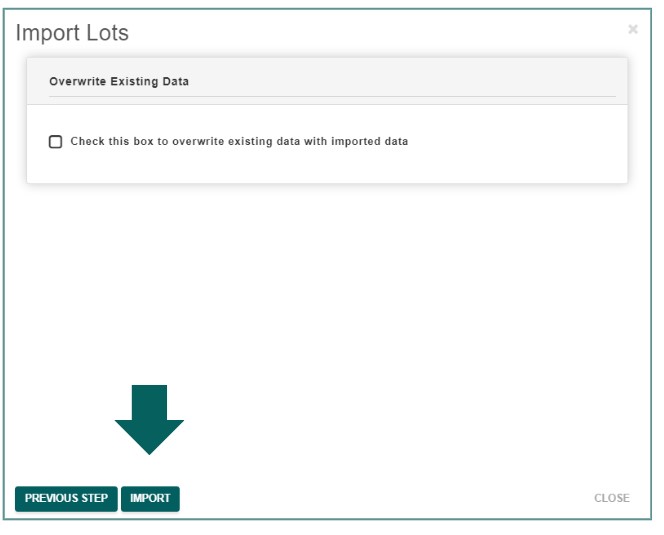
- After completing the field mapping, the next step allows you to decide whether to overwrite any existing lots in the auction. If you’re simply adding new lots, leave the box unchecked to preserve the current auction data.
Once you’re finished, click on ‘Import’ to finalize the process.
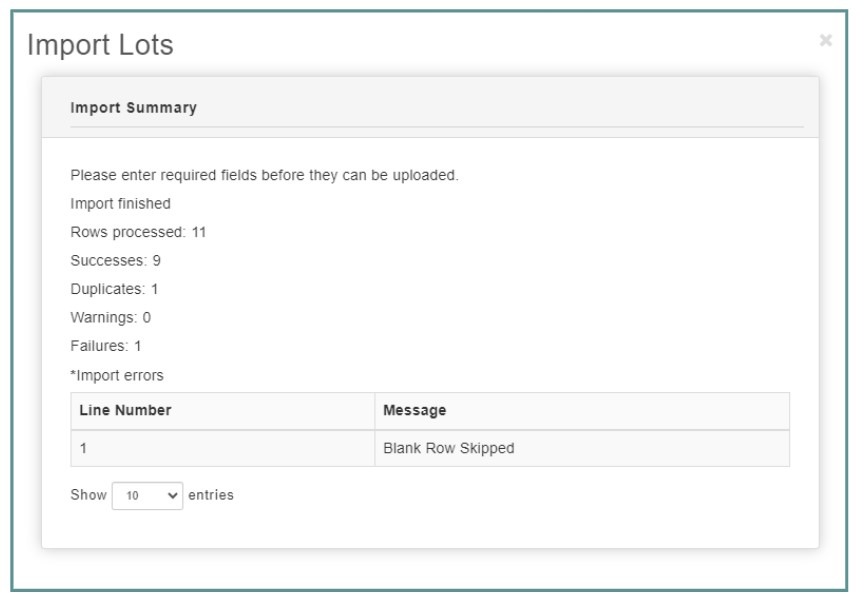
The following screen displays the Import Summary after you have completed importing lots into AF360. Here’s a breakdown of what the summary shows:
- Rows Processed:
This indicates the total number of rows from your CSV file that were processed during the import. In this case, 11 rows were processed.
- Successes:
This shows the number of rows that were successfully imported without any issues. Here, 9 rows were successfully imported.
- Duplicates:
This number represents rows that were identified as duplicates during the import process. In this example, 1 row was flagged as a duplicate.
- Warnings:
This section would display any non-critical issues that occurred during the import, which might require attention but didn’t prevent the import. In this case, there are 0 warnings.
- Failures:
This indicates the number of rows that failed to import due to errors. In this example, there is 1 failure.
- Import Errors:
Below the summary, there is a detailed section listing any errors that occurred. The Line Number corresponds to the row in your CSV file where the issue was found, and the message provides a brief description of the problem. In the following screenshot, it shows that the first line was skipped because it was a blank row.
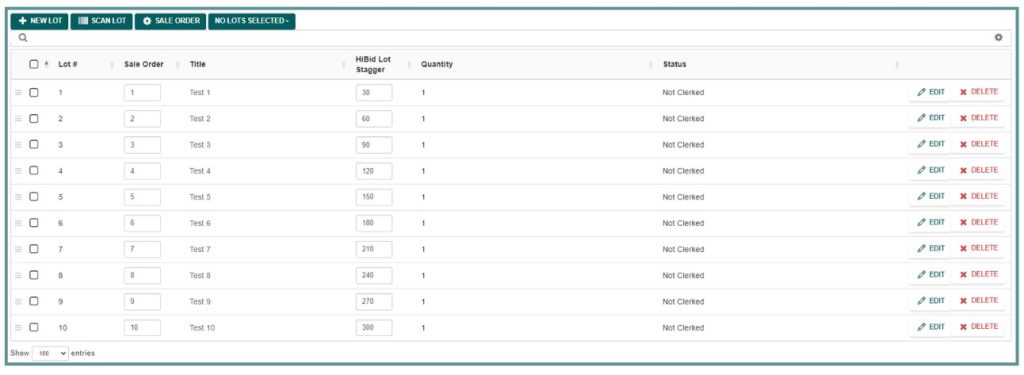
- After the import is complete, the newly added lots will be displayed in AF360.
Import Troubleshooting
If you encounter issues while importing your spreadsheet, there are several tips and tricks you can use to troubleshoot and resolve the problems.
To ensure your file is saved as a CSV (Comma Delimited) format, select the correct file type when you save the spreadsheet. Simply choose “CSV (Comma Delimited)” from the file type dropdown menu before completing the save process.
Save the File as CSV:
- Click on File in the top-left corner of Excel.
- Select Save As from the dropdown menu.
- Choose the location where you want to save the file.
Choose CSV Format:
- In the Save as type dropdown menu, select CSV (Comma delimited) (*.csv).
- Enter a name for your file and click Save.

Formatting Entire Columns or Specific Cells as Text:
Select the Cells or Columns:
- To format entire columns: Click on the column letter(s) at the top of the spreadsheet to select the entire column(s).
- To format specific cells: Click and drag to highlight the cells you want to format.
- To format the entire spreadsheet: Press Ctrl + A to select all cells in the sheet.
Open the Format Cells Dialog:
- Right-click on the selected cells or columns.
- From the context menu, select Format Cells….
Choose the Text Format:
- In the Format Cells dialog box, go to the Number tab.
- In the list on the left, select Text.
- Click OK to apply the format.
To ensure there is no wrapped text or line breaks in your Excel spreadsheet, follow these steps:
Removing Wrapped Text:
To ensure there is no wrapped text or line breaks in your Excel spreadsheet, follow these steps:
Check for Wrapped Text:
- Highlight the cells, columns, or entire sheet where you want to ensure there is no wrapped text.
- Go to the Home tab on the Excel ribbon.
Disable Wrapped Text:
- In the Alignment group, find the Wrap Text button.
- If the button is highlighted (indicating that wrap text is enabled), click it to disable wrap text for the selected cells.
Manually Adjust Row Heights:
- After disabling wrap text, the row heights should automatically adjust. If not, you can manually adjust the row height by selecting the row(s), right-clicking, and choosing Row Height. Set the height to a standard size (e.g., 15).

